

Minimizing Lodash Size in CRA and Next.js


Photo By Kelly Sikkema
When developing an application, we would usually write some utility functions that could be reused throughout the application.
An example
1//--------------2// utils.js34function sum(a, b){5 return a + b;6}78function subtract(a, b){9 return a - b;10}1112export {13 sum,14 subtract15}1617//---------------18// component.js1920import {sum, subtract} from 'utils.js';2122function calculate(a, b){23 return sum(a, b) + subtract(a, b);24}
Lodash is a package that provides a ton of utilities to help us with manipulating the data we have. It has implementations like clone, deepClone, isNil, every, sum etc. In a large application, you would import the utilities from lodash like this and use it
1import { sum } from "lodash";23<Button onClick={() => {4 console.log(sum([1, 2, 3, 3]));5}}> Sum of Array </Button>
When we are doing this named import from lodash, we are actually importing the whole lodash.js file and using just the sum function from it.
1import { sum } from "lodash";23// would be converted to4var lodash = import('lodash');56// and then accessing sum property from lodash7lodash.sum([1, 2, 3, 3])
So, with the named exports it is not possible for the bundlers like webpack to tree shake the unwanted code, and we end up shipping entire lodash utilities to the user.
You can avoid this by directly importing the utility you need from lodash like this
1import sum from "lodash/sum";2import cloneDeep from "lodash/cloneDeep";3import throttle from "lodash/throttle";4...
But this can be tough to maintain if you are using a lot of utilities from lodash in a file and you would have a bunch
of import statements at the top.
Thankfully with babel we have a plugin called babel-plugin-transform-imports, which, if configured, can transform our named imports to default file imports.
All you have to do is install babel-plugin-transform-imports
npm install --save-dev babel-plugin-transform-imports
and configure babel like this
1// pacakge.json or .babelrc file23"babel": {4 "plugins": [5 [6 "babel-plugin-transform-imports",7 {8 "lodash": {9 "transform": "lodash/${member}",10 "preventFullImport": false11 }12 }13 ]14 ]15}
What this essentially does is
1import { sum } from "lodash";23// would be converted by babel on build step to4import sum from "lodash/sum";56// then on the webpack chunk7var lodash_sum = import('lodash/sum.js');89// and then10lodash_sum([1, 2, 3, 3])
Which results in a smaller bundle size!
Let's Measure It#
The significant step that we need to do while carrying out performance optimizations is to measure it.
We need to measure the cost before and after introducing an optimization.
If we aren't measuring it, one little mistake with the optimization would cost us additional performance hit than what was before! So, the rule of the thumb is
Don't do performance optimizations without measuring it.
Let's create a react app
npx create-react-app fresh-cra
I am using latest version of create-react-app, with the below packages
1"react": "^17.0.2",2"react-dom": "^17.0.2",3"react-scripts": "4.0.3"
I am going to install lodash
npm install lodash
Then, I am going to modify the App.js to include the sum function
1import "./App.css";2import { sum } from "lodash";34function App() {5 return (6 <div className="App">7 <button8 onClick={() => {9 console.log(sum([1, 2, 3, 3]));10 }}11 >12 Sum of Array13 </button>14 </div>15 );16}
Now, let's analyse the bundle size.
For this, we would use the package source-map-explorer which gives a nice visualisation of the bundles that we ship to the users.
1npm install --save source-map-explorer
Add a new script in package.json
1"scripts": {2+ "analyze": "source-map-explorer 'build/static/js/*.js'",3 "start": "react-scripts start",4 "build": "react-scripts build",5 "test": "react-scripts test",
I am going to build the app to create a /build folder
$ npm run buildCompiled successfully.File sizes after gzip:65.17 KB build/static/js/2.ab4556c4.chunk.js1.63 KB build/static/js/3.49b2ab04.chunk.js1.17 KB build/static/js/runtime-main.97cb050d.js574 B build/static/css/main.9d5b29c0.chunk.css469 B build/static/js/main.c3c1410a.chunk.js
Now, I am going to run analyze
npm run analyze
Running this command would open a tab in the default browser with the bundle details.

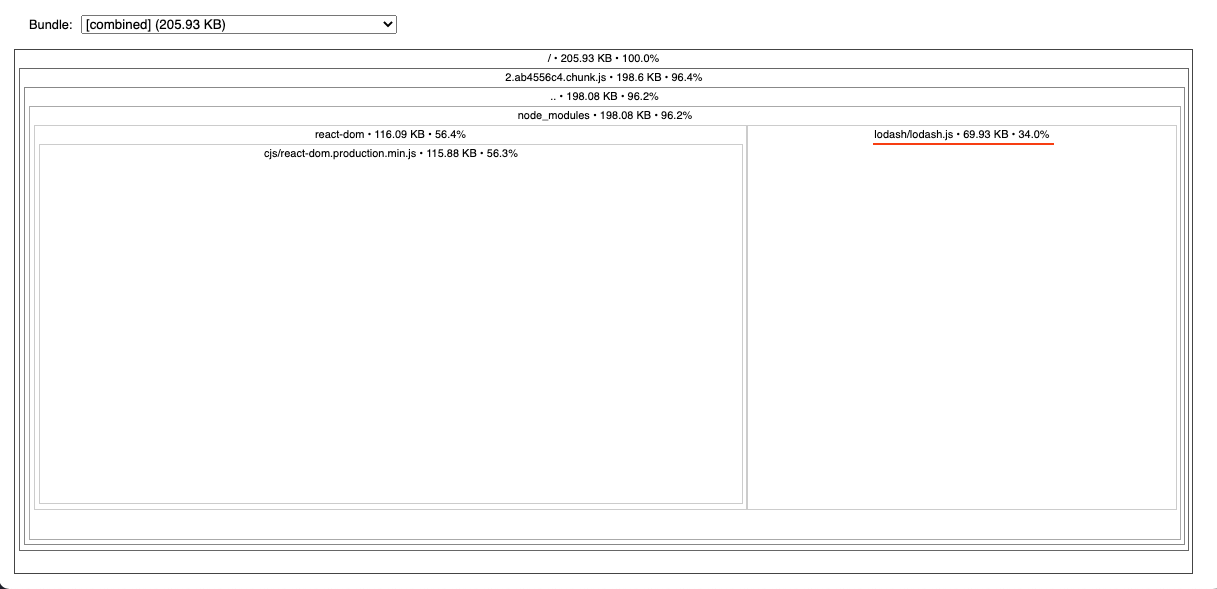
If the image is too small, the box which has text underlined in red is the size of lodash we are serving to users. We are shipping ~70 KB of lodash package just for using a simple sum utility. Accounts for about 35% of total bundle size 🤯
Let's optimize it#
I am going to install babel-plugin-transform-imports
npm install --save-dev babel-plugin-transform-imports
In order to tweak babel configuration without ejecting from create-react-app, we need to add additional packages.
npm install -D react-app-rewired customize-cra
Then create a config-overrides.js file in your root directory with this code
1/* config-overrides.js */2const { useBabelRc, override } = require("customize-cra");34module.exports = override(5 // eslint-disable-next-line react-hooks/rules-of-hooks6 useBabelRc()7);
Replace react-scripts with react-app-rewired in package.json
1- "start": "react-scripts start",2- "build": "react-scripts build",3+ "start": "react-app-rewired start",4+ "build": "react-app-rewired build",
The override setup is completed. Now, we can configure babel in create-react-app!
To do that, create a .babelrc file in root directory and use the following code
1{2 "plugins": [3 [4 "babel-plugin-transform-imports",5 {6 "lodash": {7 "transform": "lodash/${member}",8 "preventFullImport": true9 }10 }11 ]12 ]13}
Now that we are all set, let's run the build
1$ npm run build23Compiled successfully.4File sizes after gzip:56 41.41 KB (-23.75 KB) build/static/js/2.39f2f9c9.chunk.js7 1.63 KB build/static/js/3.49b2ab04.chunk.js8 1.17 KB build/static/js/runtime-main.97cb050d.js9 574 B build/static/css/main.9d5b29c0.chunk.css10 472 B (+3 B) build/static/js/main.9d111c34.chunk.js
then
npm run analyze
💥 Boom! 💥
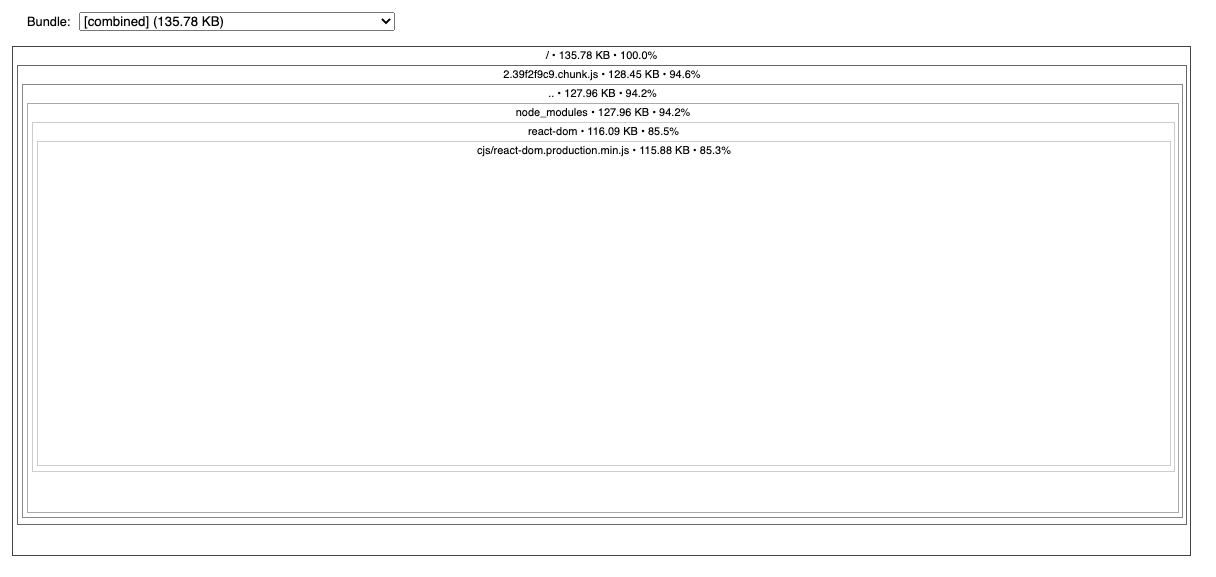
In the above image, we could not see the lodash box that we saw earlier because of optimization
It looks like lodash is gone! Actually, it's not. Since the cost of sum utility is so small, our source-map-explorer isn't showing that up. Right after the build command, you can see the reduction of chunk size by 23 KB.
Let's explore further#
If you are satisfied with the optimization by looking at the output from source-map-explorer then we are good. If you are not, and you are really curious to see the babel magic, let's explore further.
First, let's go back to the state of our application before optimization.
This is simple for us, just replace react-app-rewired with react-scripts
1- "build": "react-app-rewired build",2+ "build": "react-scripts build",
Now, to see the babel transpilation, go to webpack.config.js file in node_modules directory and look for the object optimization
with the key minimize then make that as false
1// node_modules/react-scripts/config/webpack.config.js23...4return {5 ...6 optimization: {7 minimize: false, //isEnvProduction,8 ...9 }10}
This would stop the minification of our source code by webpack, so that we can understand what is shipped to the end-user.
Now, run the build command.
$ npm run buildCompiled successfully.File sizes after gzip:142.77 KB (+77.6 KB) build/static/js/2.b2a9563e.chunk.js2.48 KB (+1.31 KB) build/static/js/runtime-main.51b24467.js2.06 KB (+441 B) build/static/js/3.8a130f73.chunk.js960 B (+491 B) build/static/js/main.1ad88ea0.chunk.js625 B (+51 B) build/static/css/main.9d5b29c0.chunk.css
The first thing you can observe here is the increase in bundle size! This is because we are no longer minifying our code.
Go into the /build/static/js folder and open the main chunk (main.[HASH].chunk.js).
Search for lodash, and you will see the below code
1...2// EXTERNAL MODULE: ./node_modules/lodash/lodash.js3var lodash = __webpack_require__(4);45...67// sum is accessed as a property from lodash object8("button",{onClick:function onClick(){console.log(Object(lodash["sum"])([1,2,3,3]));},children:"Sum of Array"})9...
The one on line number 8 is the transpiled JSX that we wrote.
I have already explained about the JSX transpilation in the post React is Just Javascript
Now, let's do the optimization
1- "build": "react-scripts build",2+ "build": "react-app-rewired build",
and run the build
$ npm run buildCompiled successfully.File sizes after gzip:49.64 KB (-93.13 KB) build/static/js/2.08144287.chunk.js2.48 KB build/static/js/runtime-main.51b24467.js2.06 KB build/static/js/3.8a130f73.chunk.js965 B (+5 B) build/static/js/main.22f99645.chunk.js625 B build/static/css/main.9d5b29c0.chunk.css
Let's check the transpiled chunk (/build/static/js/main.22f99645.chunk.js)
1// EXTERNAL MODULE: ./node_modules/lodash/sum.js2var sum = __webpack_require__(4);3var sum_default = /*#__PURE__*/__webpack_require__.n(sum);45// default sum is called6("button",{onClick:function onClick(){console.log(sum_default()([1,2,3,3]));},children:"Sum of Array"})
Did you notice the difference in the code that we shipped?
Instead of importing everything from lodash.js we are now importing from lodash/sum.js.
Now we can be confident that the babel transform is working as expected.
How to configure for Next.js#
In the demo above, we saw how to configure babel-plugin-transform-imports in create next app CLI. If you are using lodash package with NextJS and if you want to reduce the footprint, it is very simple to do without doing the extra work of rewiring and customizing stuff.
Next.js provides a way for us to tweak into babel and webpack configuration without any hassle. This is the thing I like about Nextjs, it sets up all the right defaults for you, and at the same time, it gives you the root user permissions to tweak the stuff. Enough said, let us see how to do this (in) next.
First install babel-plugin-transform-imports
1npm install --save-dev babel-plugin-transform-imports
Then create .babelrc file in the root directory and place this code.
1{2 "presets": ["next/babel"],3 "plugins": [4 [5 "babel-plugin-transform-imports",6 {7 "lodash": {8 "transform": "lodash/${member}",9 "preventFullImport": true10 }11 }12 ]13 ]14}
This custom configuration file would be picked by next while building your application.
That's it! Congrats 🎉
Now you have shipped just the code you need to run your application !
The beauty of the package
babel-plugin-transform-importsis that it can be used to optimize the imports of other packages as well like Material UI, react-bootstrap etc.
References
Published:July 4, 2021
Updated:June 10, 2024